
Start of the Year Database Clean-up
Before making major changes to the data, you should do a backup (close TriFIT, click Start -> Programs -> HealthFirst or Polar TriFIT -> TriFIT Backup, click the Backup tab, & then click the Backup button)
Moving Students – Archiving
If you wish to move students from a database on one computer to a different computer (or different school), you can archive them, then import them into the new computer. In TriFIT, click Utilities -> Database Management, select the students assigned to any user field (such as period or class of), click Edit -> Select All, & click File -> Copy to create a copy file of those students. Then select the same students and go to Edit -> Delete to remove them from the database. NOTE that the File -> Archive function should only be used if you are archiving ALL of the students in the database. Then take that copy file to the other computer (school), go to Utilities -> Database Management, click File -> Restore, & select the copy file to restore.
Prepping for Importing New Students
If you are about to import a new student list into TriFIT, this is a good method to move all of the students out of their current teacher/class assignments before you do the import. In TriFIT, click Utilities -> Quick User Field Entry. Click Select All to select all students, put a check in the box next to Teacher, & type in something unique, such as ‘OldStudents’, then click Replace. This will assign all students to a teacher called OldStudents. Then, when you import your student list (in TriFIT, go to Student -> Import Students), as long as the import text file has the proper teacher/class assignments, the students (& all of their previous test data) will be moved to the proper teacher/class. After doing the import, any students still assigned to OldStudents would be those who were not in the import text file (they may have graduated or left the school). You can also go to Utilities -> Database Management, select the students assigned to OldStudents (or any other user field), & click File -> Copy to copy those students out of the database, then select the same students and go to Edit -> Delete to remove them from the database.
PEManager
Before making major changes to the data, you should do a backup (close PEManager, click Start -> Programs -> Polar PEManager, Database Management, click the Backup tab, & then click the Backup button.
The best way to remove the old students from PEManager is to close PEManager, then click Start -> Programs -> Polar PEManager, Database Management. In there, go to the Utilities tab, & click the Copy -> Archive button. You can click Edit -> Select All (if you want to select all students), then click File -> Archive to remove the students & their data. Note, this will remove all students you selected from the PEManager database, but will not affect the items you have set-up in the Wizard (grading schemes, rubrics, assignments, etc.), the Wizard will still have everything, except the students.
Import Text File – TriFIT
Order of fields to import a comma delimited text file:
1. Student ID (numeric, up to 9 characters)
2. Student last name (20 characters)
3. Student first name (20 characters)
4. Date of birth (mm/dd/yyyy OR mm/dd/yy)
5. Gender (male, female, m, f)
6. Teacher last name (UserField 1, 20 characters)
7. Period (UserField 2, 20 characters, alphanumeric)
8. Graduating year (UserField 3, yyyy OR yy)
Example: 525435432,Doe,John,09/17/1989,M,Smith,1,2003
- TriFIT requires fields 1 thru 5 (6 – 8 are optional) in the order specified
- TriFIT can have additional user fields as well
Import Text File – PEManager
Order of fields to import a comma delimited text file:
1. Student ID – 20 alphanumeric characters
2. Last Name – 30 alphanumeric characters
3. First Name – 30 alphanumeric characters
4. Date of birth – mm/dd/yyyy or mm/dd/yy
5. Sex -M/F/m/f
6. Teacher Last Name – 30 alphanumeric characters
7. Teacher First Name – 30 alphanumeric characters
8. Course – 50 alphanumeric characters
9. Street Address (& address 2) – 30 alphanumeric characters
10. City – 30 alphanumeric characters
11. State/Province – 20 alphanumeric characters
12. Zip/Postal Code – 10 alphanumeric characters
13. Phone # – (999)999-9999
- comma, tab or pipe delimited
- the first 5 fields are required, other fields are optional
- the first 5 fields should be in order, other fields can be in any order, you must map them appropriately
- May add up to 16 Custom Fields, & view them by clicking View -> Custom View in PEManager
- The import wizard will notify you of any errors & allow you to fix them
- You can create 1 import text file to import to both TriFIT & PEManager, but you must match the above criteria for field sizes & type. If there are fields in the import file that you don’t need or want, don’t MAP them while doing the import.
You can either create the import text file from your own database, or open an Excel spreadsheet. Use one column in Excel for each of the fields described above. Then, in Excel, click File -> SaveAs -> & change the file type to .CSV (comma delimited). Then in PEManager, click File -> Import, & follow along with the import wizard, <<OR>> in TriFIT, click Student (or Client) -> Import, & follow along with the import wizard. You’ll need to map the fields appropriately during this step.
If you have a text file that you want to import into Excel (so you can easily make changes to the file), open Excel, then click File -> Open. Change the FileType to TextFiles, then browse to the file, & select Open. In the ImportTextWizard, selct Delimited & click Next. On the next screen, select the type of Delimeter (Comma), & click Finish.
COMMAs in the import file
If you have commas in the Excel spreadsheet, when you go to save it as a .csv comma delimited file, Excel will put double-quotes around any field that has a comma in it. This will most likely generate an error or other problem during the import process. There are 2 possible solutions to this problem:
- In Excel click Edit -> Replace and replace all commas with nothing, or a space, or a dash mark. Then when you are doing the import into trifit/pemanager the data that was in the field with the comma will appear as a single field.
- If every single record has a comma in the same field (for example you have tearcherlastname,teacherfirstname then you can go ahead and save the file as a .csv file and close out of Excel. Then right-click the .csv file and go to Open With -> Notepad. In Notepad you will see the double quotes and you can click Edit -> Replace, and replace all double quotes with nothing. This will result in teacherlastname,teacherfirstname appearing as two separate fields during the import.
How to Setup your View
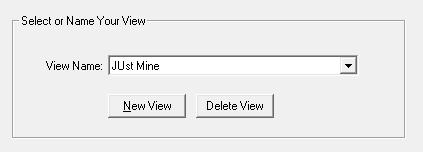
Views are controlled when you click the glasses icon. Click on the glasses to add or edit views.

Step 1. Name your “new” view.
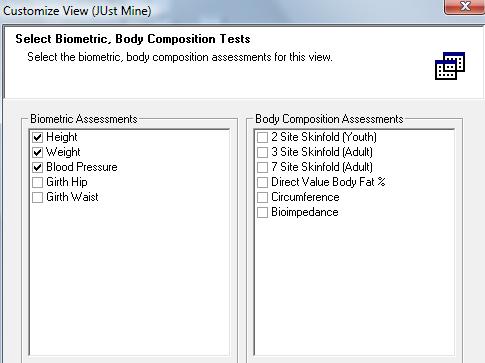
Step 2. Choose your Biometric and Body Composition Assessments
Step 3. Select your choices for fitness assessment.

Step 4. These are Adult Fitness tests and may not apply to your students.

Step 5. Health Risk Appraisals

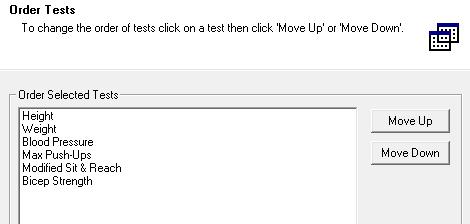
Step 6. Review your choices and change order.
You can create as many Views as you need. They will be saved for future use.
Database Management
Database Management is provided to allow the TriFIT user to copy files to a disk, move files from the TriFIT database to a disk, and/or restore test data from a disk.
Clicking on Database Management from the Utilities pull down menu bring up the main Database Management screen displays Name, Client ID, Test Date and Group Name. A record is displayed for every test.
File
Clicking on File in the upper left corner provides you with the following options:
- Copy To – Copies selected records to a specified drive (i.e., disk). NOTE: All records will remain within the TriFIT database because you are simply COPYING NOT moving. You can also point and click on the icon displaying three disks to perform this same function.
- Move To – Moves selected records to a specified drive (i.e., disk). NOTE: These records will no longer be within the TriFIT database because you have MOVED them. You can also point and click on the icon to perform this same function.
- Restore From – Restores records to the TriFIT database that had previously been removed. Restore From can also be activated by pointing and clicking on the disk icon.
- Close – Exits Database Management and returns you to the main TriFIT screen.
Edit
Clicking on Edit provides you with the following options:
- Delete Selected – Deletes selected records from the TriFIT database.
- Select All